The Kenwood RC-D710’s firmware must be upgraded to version 2.01. This firmware upgrade is available for download from Kenwood’s web site. The Kenwood MCP-2A memory control program is a free download and is required to adjust the data terminal TX level to 15. The standard data terminal TX level setting is to low for the Icom 2820H.
The MCP-2A memory program and the 2.01 firmware can be downloaded for free from Kenwood’s web site: http://www.kenwood.com/i/products/info/amateur/software_download.html.
The firmware upgrade and some of the settings on the RC-D710 must be performed with a computer. To connect the RC-D710 to a computer you need to purchase the Kenwood PG-5G PC data cable. The PG-5G cable is not included with the RC-D710 or the PG-5J interface kit.
Required Items:
Kenwood RC-D710 Control Head - $199.95
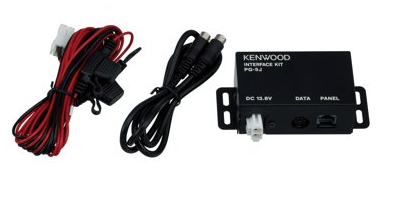
Kenwood PG-5J Interface Kit - $87.95
Kenwood PG-5G PC Data Cable - $41.95
A 2.5mm Mini Stereo Jack Plug - $2.99 at Radio Shack
For the Icom 2820H to pass its GPS data to the Kenwood RC-D710, the G-D data setting on the 2820H must be turned on. Also on the GPS sentence menu set RMA and CGA to on.
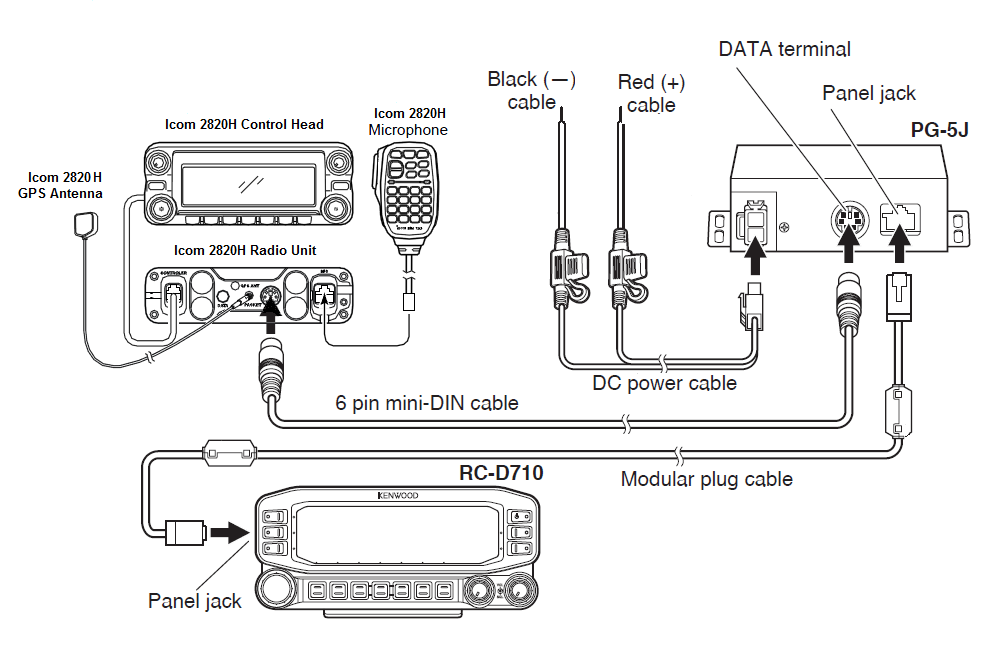
Here is a diagram showing all the connections except the GPS connection between the Icom 2820H and the Kenwood RC-D710.
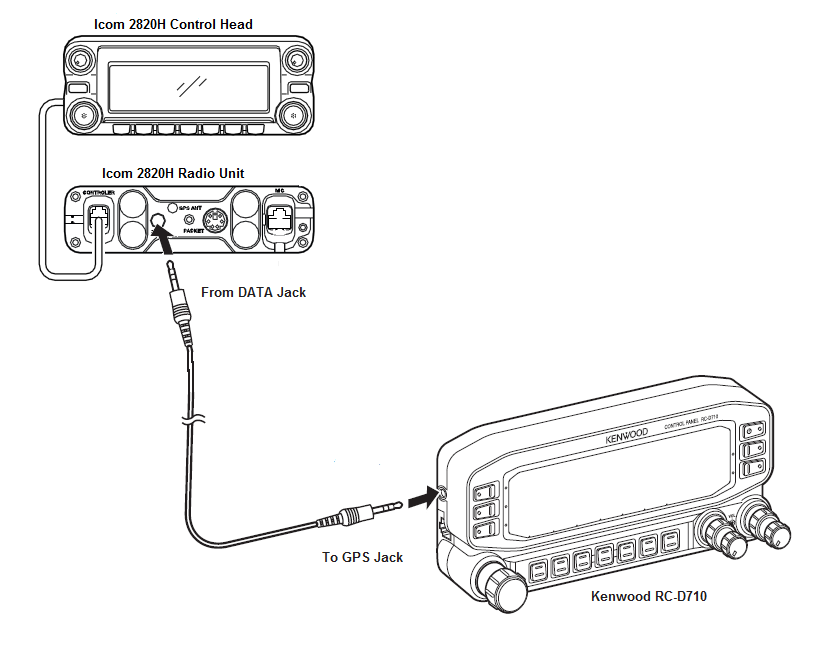
Here is a diagram of the GPS cable that connects the Icom 2820H to the Kenwood RC-D710. The cable is included with the Kenwood RC-D710 except it’s missing the mini stereo plug on one end. You will need to purchase a 2.5mm mini stereo plug (the same size as the Kenwood supplied plug) and solder it to the cable. Connect this cable from the Icom 2820H’s front DATA jack to the GPS jack on the side of the Kenwood RC-D710.
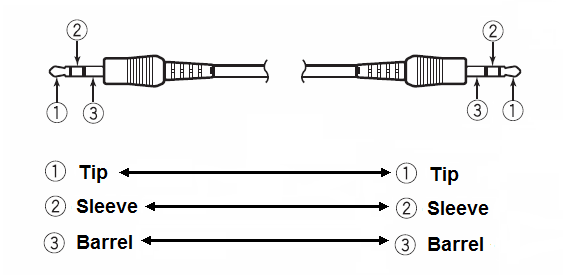
Here is a diagram of the GPS cable that must be assembled. Radio Shack has these plugs listed as 3/32” (3/32” = 2.5mm) Model: 274-244, Catalog #: 274-244. The tip wire must be soldered to the tip on the purchased mini stereo plug. The sleeve wire must be soldered to the sleeve of the purchased mini stereo plug. The barrel wire must be soldered to the barrel of the purchased mini stereo plug. You could also just purchase a regular stereo cable At Willy's Electronic Supply 5482 Complex Street 103-105. 6’ cable #70-206 $3.99, 12’ cable #70-212 $4.29.
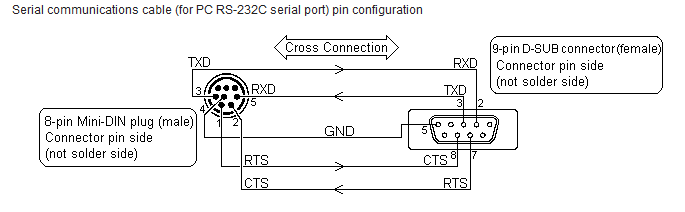
Here are the diagrams for the Kenwood PG-5G PC Data Cable if you would like to build your own.

Kenwood RC-D710 Settings:
Upgrade firmware to version 2.01
Using the MCP-2A memory control program set the PKD PIN (1200bps) setting to 15. This setting can only be set with the MCP-2A memory control program. This setting is located on the menu bar under EDIT > Data Terminal. You can also set all the other APRS settings with the MCP-2A memory control program.
From the RC-D710 control head you can change most of APRS settings by pressing the F function button then pressing the tuning knob on the lower left of the display head.
Set your call sign and beacon settings from the APRS menu if using the RC-D710 control head.
Set the GPS Port Input setting to “GPS”. The letters “GPS” will blink on the RC-D710 control head if it is receiving GPS data from the Icom 2820H.
Icom 2820H Settings:
Set the left side of the 2820H to 144.39 MHz for APRS. Then from the menu select Packet and set Packet Band to “L” (Left).
In the Menu’s GPS sentence set RMA and GCA to on.
To send GPS data to the RC-D710 the “G-D” setting must be on. This setting is toggled on and off by pressing “DATA” from the GPS Position screen. Press the F button a few times to get to the GPS Position screen. “G-D” will display on the 2820H screen if this setting is on.
Alternative Installation Method:
Instead of using the Kenwood PG-5J interface kit, some operators are building their own interface cable. Below is a diagram showing the connections for building your own interface cable. You will need to configure a way to provide 10 volts to power the RC-D710. The Kenwood PG-5J interface kit converts the vehicle 12 volts to 10 volts for you. This modification will void the warranty on the Kenwood RC-D710. Perform this modification at your own risk.
